
In This Article
This article explains how to connect the GrowSpace Gateway Q1 to a private MQTT broker (Mosquitto) to directly receive real-time location data from tags and anchors, and how to visually verify it using MQTT-Studio.
By default, the gateway connects to the Freegrow server,
but if you need internal testing or integration with an external system, you can easily set up your own environment using Mosquitto.
What Is Mosquitto?
Mosquitto is an open-source message broker built on the MQTT (Message Queuing Telemetry Transport) protocol.
MQTT is a lightweight communication protocol widely used in IoT (Internet of Things) environments, and it can handle real-time message exchange between devices very efficiently.
Mosquitto has the following characteristics:
- Simple and lightweight to install and configure.
- Operates reliably even with hundreds to thousands of devices connected simultaneously.
- Operates over TCP/IP, and authentication/encryption settings are also supported.
Since the GrowSpace Gateway Q1 transmits data using the MQTT protocol by default, using Mosquitto lets you receive and process data in your own server environment without needing a separate cloud.
Installing and Configuring the Mosquitto Broker
Installing Mosquitto
- Download the Windows installer from the official Mosquitto page
Follow the default installer options to complete installation
Enabling External Connections
- Open the configuration file at the path below using Notepad or VS Code:
C:Program Filesmosquittomosquitto.conf
- Add each of the following two items below their corresponding location:
Search for the
#listenerentry, and add the following line below it:listener 1883 0.0.0.0
* Search for the#allow_anonymousentry, and add the following line below it:allow_anonymous true
🔸 The
listenerentry specifies the port that allows connections from external devices.
🔸allow_anonymous trueallows connections without user authentication.
Leave the existing #listener and #allow_anonymous false lines commented out (#) as they are.
The two newly added lines are what actually take effect.
- After saving, restart Mosquitto or reboot the PC.
This configuration allows external devices (such as the GrowSpace gateway) to connect to the Mosquitto broker.
Opening the Port in Windows Firewall
For the Mosquitto broker to communicate with external devices (such as the GrowSpace gateway), TCP port 1883 must be allowed through the firewall.
Add an inbound rule by following the steps below.
Method
Click the Start button → type firewall → open Windows Defender Firewall
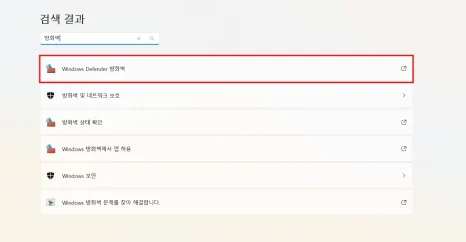
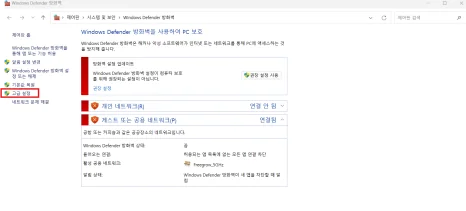
Select Advanced settings from the left menu
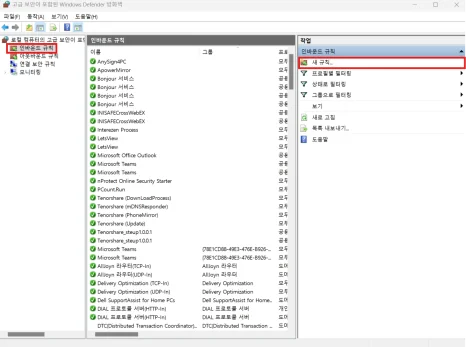
Click Inbound Rules on the left menu → select New Rule on the right
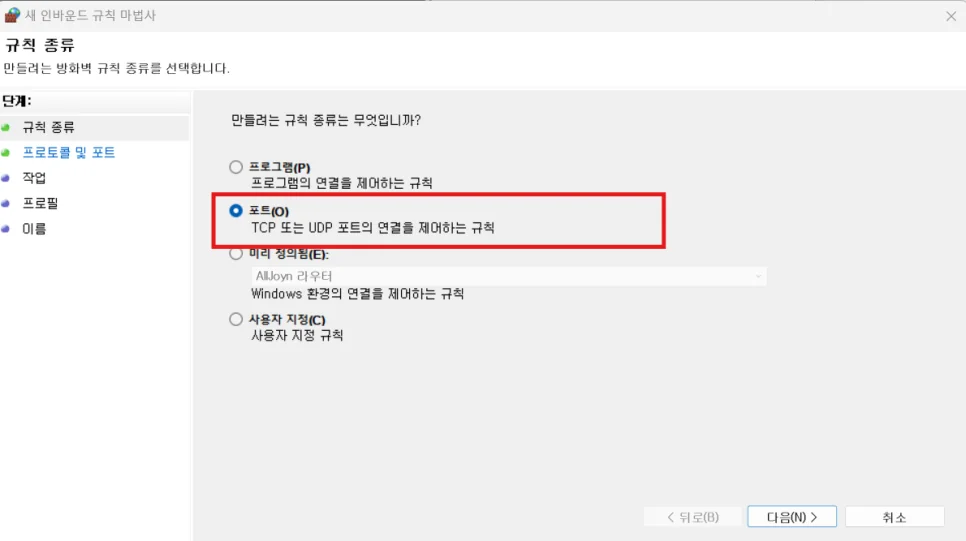
Select Port as the rule type → Next
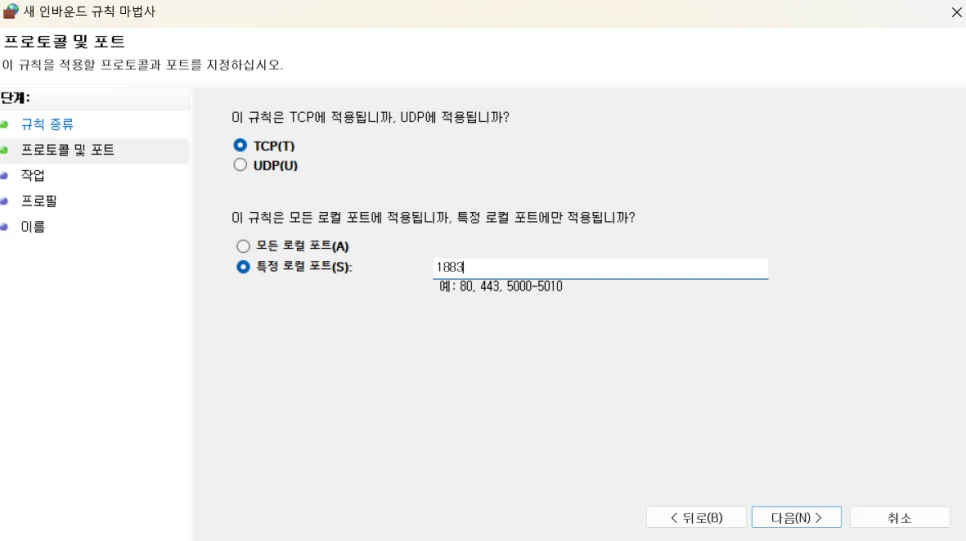
Protocol and Ports
Protocol: TCP
Specific local ports: 1883 → Next
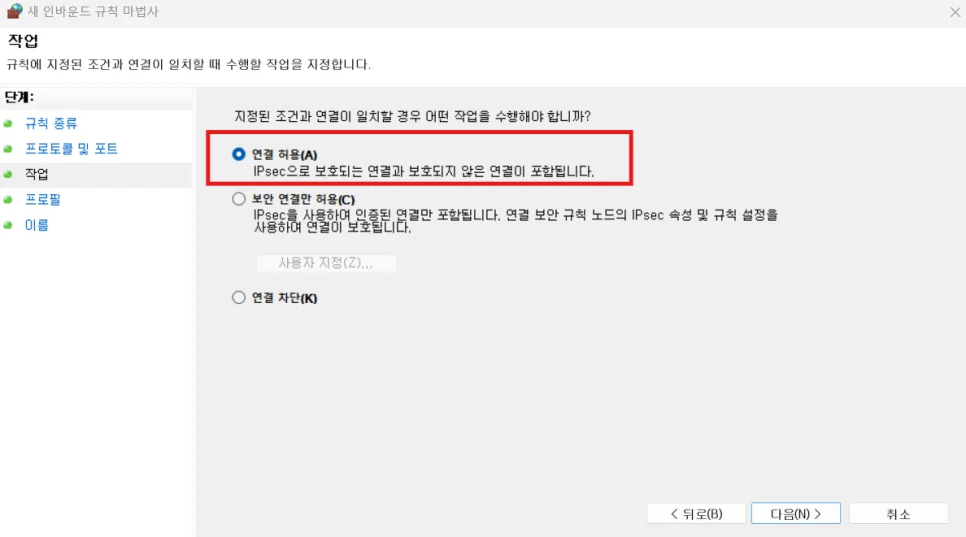
Action
Select Allow the connection → Next
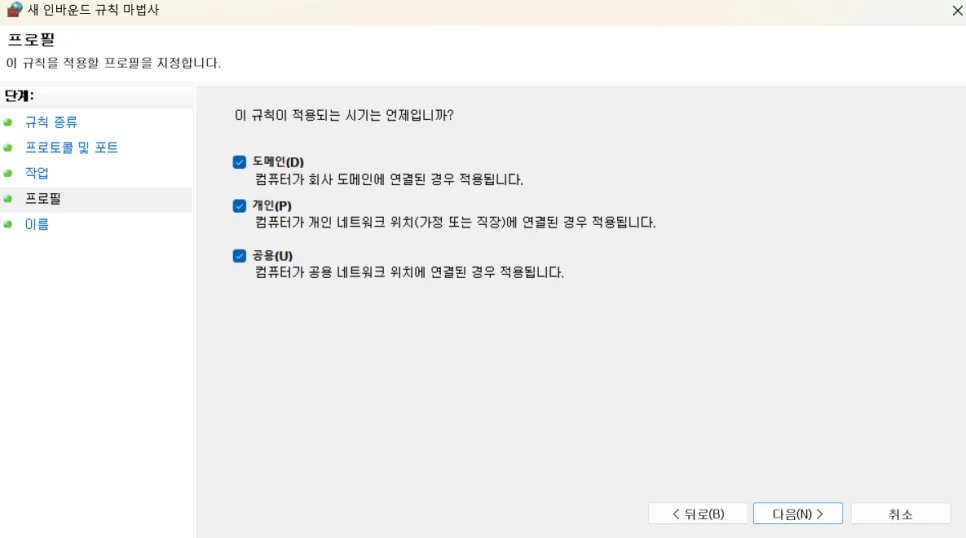
Profile
Check all of Domain / Private / Public → Next
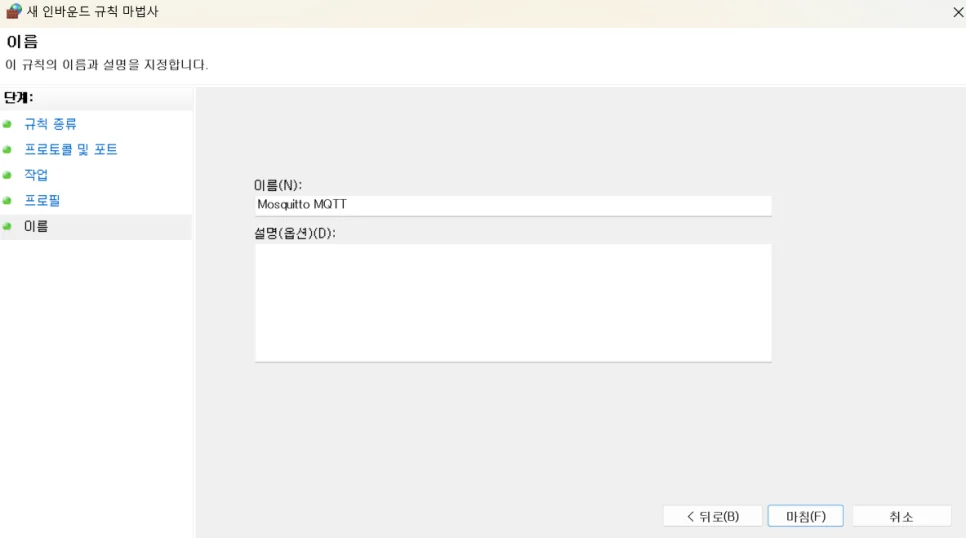
Name
Allow Mosquitto MQTT → Finish
Once configured, restart your computer to apply the changes.
If the port is not opened correctly, the gateway will not be able to send data to the MQTT broker.
If you are unable to connect during testing, please check your firewall settings again.
Installing MQTT-Studio and Connecting to the Broker
Why Is This Tool Needed?
MQTT-Studio is a visualization tool that connects to the Mosquitto broker and lets you check in real time whether location data is being transmitted correctly.
- Instantly view MQTT messages sent from the gateway
- Easily view Start, Config, and Devices data separated by topic
- Useful for development, debugging, and demos
Installation
Launch Microsoft Store from the Windows taskbar
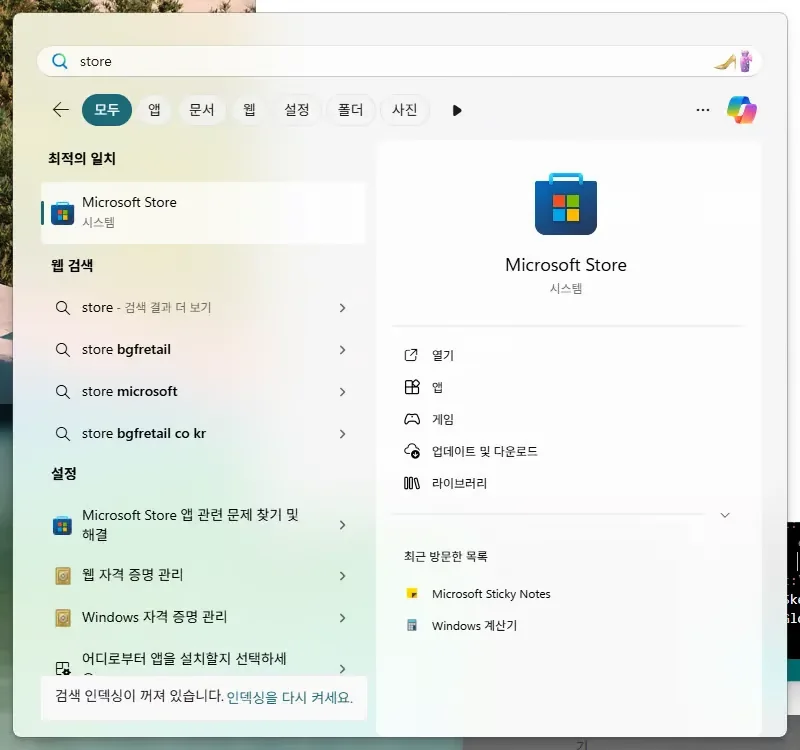
Type "MQTT-Studio" into the search bar at the top
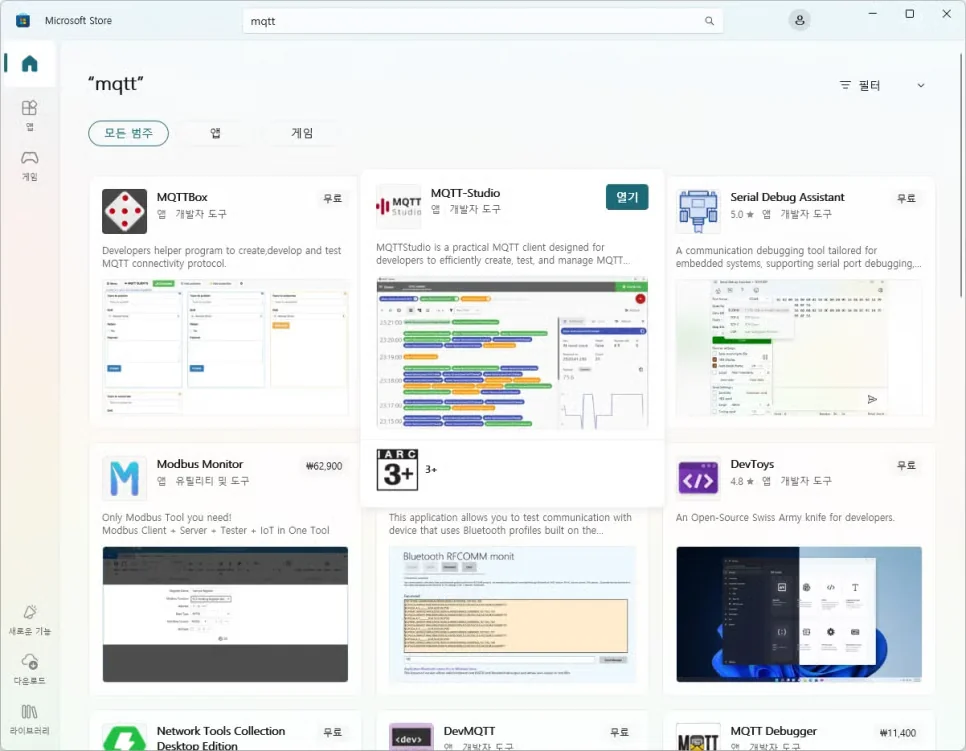
Select MQTT-Studio from the list and click [Install]
Once installation is complete, launch the program
Configuring the Broker Connection
After launching MQTT-Studio, click the [New Project] button in the left menu.
Enter the following fields:
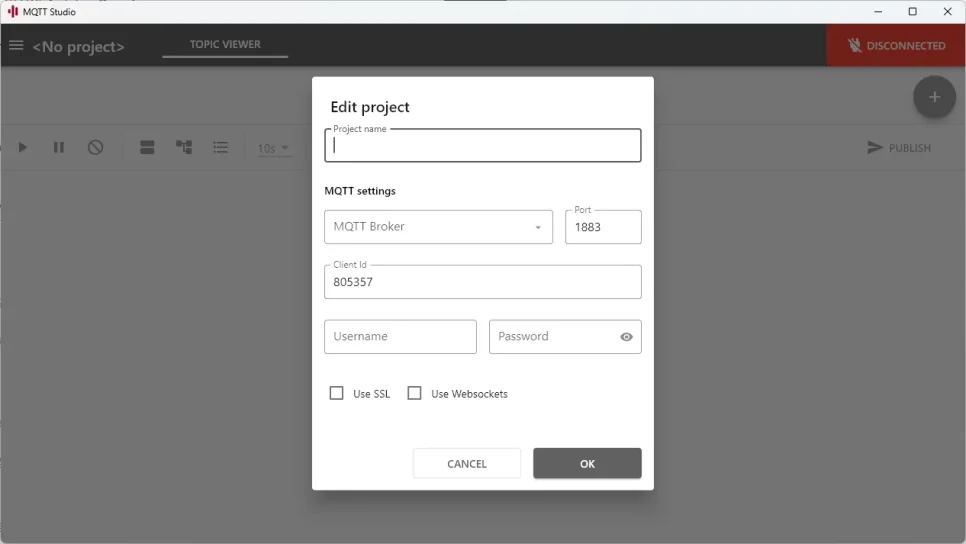
| Field | Description |
|---|---|
| Project name | Enter a name of your choice (e.g., growspace-test) |
| MQTT Broker | The IP address of the PC where Mosquitto is installed (Windows CMD → ipconfig → check the IPv4 address) |
| Port | 1883 (keep the default) |
| Client ID | Any unique ID (e.g., testclient1) |
| Username / Password | Can be left blank if not separately configured |
On the same router (internal network), entering just the IP address will connect immediately.
To connect from an external network (the internet), you’ll need to set up
port forwarding on the router of the PC where the broker is installed: forward TCP 1883 → internal IP
Verifying the Connection
After entering all fields, click the [Connect] button.
If the connection succeeds, the CONNECT button at the top of the screen becomes active.
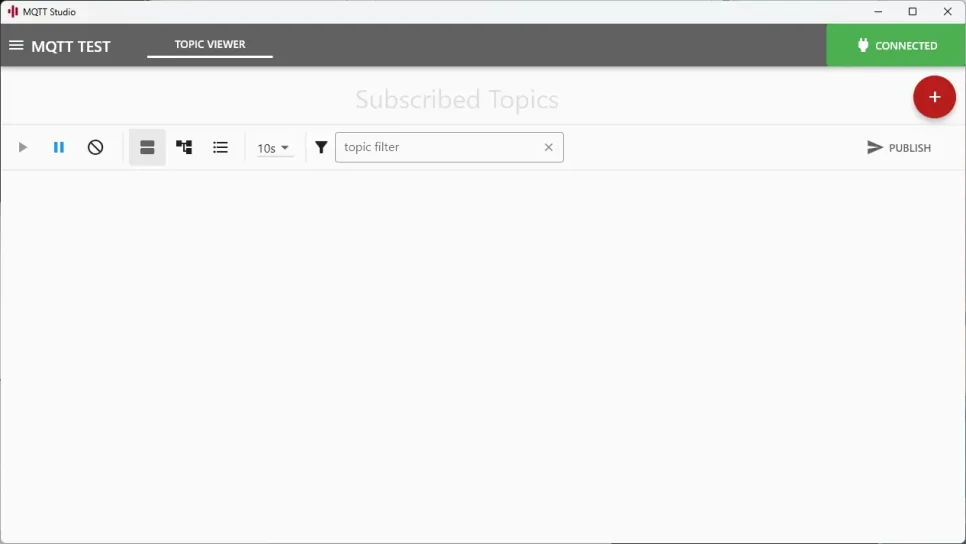
Environment Setup Complete
You have now installed the Mosquitto broker, configured the port, and set up data visualization through MQTT-Studio. Through this process, you’ve built an environment that can receive UWB location data collected by the GrowSpace Gateway Q1 through your own broker.
In the next step, you can proceed to configure the gateway device and actually start transmitting location data.